
How to Make a Stage Plot for Your Band: A Practical Guide
Learn how to make a clear stage plot for your band, including layout, inputs, monitors, notes, and the details venues need before the show.
If you landed here because a venue, promoter, or sound engineer asked you to send a stage plot, that is how a lot of musicians first encounter the term. The request often appears in an email while a show is being advanced: “Can you send over your stage plot and input list?” You may have been sent another band's document as an example and are now trying to work out what the icons, channel numbers, and monitor notes mean.
From the venue's perspective, the request is fairly simple. Before the day of the show, the production team needs to know how many people are arriving, where they will stand, what needs to be connected to the sound system, and how the performers will hear themselves. A stage plot puts that information into a quick visual document so the crew does not have to learn your entire setup while the band is unloading.
Making a stage plot can still feel more technical than it really is. You are not drawing a construction plan or trying to account for every cable onstage. You are giving the venue a clear picture of who will be onstage, where everyone will stand, what equipment will be used, and what the production team needs to prepare before you arrive.
A useful stage plot should be easy to understand in a few seconds. The sound engineer should be able to look at it and see where the drum kit goes, which side of the stage the bass amp belongs on, how many vocal positions there are, where monitor wedges or in ear connections are needed, and whether any unusual equipment is part of the setup. The attached inputs, monitoring details, and notes can handle the information that does not fit naturally into the drawing.
The goal is not to make the most impressive looking document. The goal is to remove questions before load in. This guide walks through how to make a stage plot that is detailed enough to be useful without becoming difficult to read.
What should a stage plot include?
A stage plot is a view of the stage from above. It normally shows each performer, the instruments they play, amplifiers, keyboards, drum kits, vocal microphones, direct boxes, monitor wedges, and other equipment that affects the physical setup. It should also label stage left and stage right so there is no confusion about orientation.
The drawing is only one part of the information a venue may need. A complete stage plan usually includes four related pieces:
| Section | What it communicates |
|---|---|
| Stage plot | Where performers and equipment will be placed |
| Inputs | Every source that needs to reach the sound system |
| Monitoring | The wedges, in ear mixes, or other monitoring each performer needs |
| Notes | General details such as who provides equipment, power needs, or flexible alternatives |
These sections should support each other without repeating everything. If the plot already shows a vocal microphone in front of the guitarist, the Inputs field can identify that source as the guitarist's backing vocal. The Monitoring field can explain what that performer needs in the wedge. The Notes field can say whether the band carries its own microphone or expects the venue to provide one. For a fuller checklist of what FOH and monitors look for, see what venues actually need on a stage plot.
1. Start with the lineup, not the drawing
Before placing anything on a stage, write down the people and sound sources involved in the show. This sounds obvious, but it prevents the most common kind of stage plot mistake: drawing the obvious instruments and forgetting the less visible parts of the setup.
For a five piece rock band, the basic list might include drums, bass, two electric guitars, and a lead vocalist. From there, add the details that affect production. Does the bassist also sing? Does one guitarist switch to acoustic for part of the set? Are backing tracks running from a laptop? Does the drummer use a sample pad? Does the lead vocalist need a guitar stand, a pedalboard, or a wireless receiver nearby?
You do not need to show every personal item. A set list, water bottle, and spare snare drum are normally irrelevant to the venue. Focus on the people, equipment, connections, and space that the crew may need to prepare around.
2. Set the stage orientation
Stage left and stage right are named from the performer's perspective while facing the audience. That means stage left appears on the right side of a typical stage plot, and stage right appears on the left side of the page. This is easy to reverse, especially when you are picturing the band from the audience.
Label both sides of the plot. Even if the layout feels obvious to you, the labels remove any chance of confusion during setup. It is also helpful to keep the audience at the bottom of the drawing so the plot follows the convention most production teams expect.
If your band is flexible about its positioning, you can say so in the Notes field. Some rooms have unusual dimensions, permanent backline, or a stage entrance that makes your normal setup impractical. A plot should show the preferred arrangement, while a short note can make it clear which details are flexible.
3. Place the performers and largest equipment first
Start with the parts of the setup that take up the most space. For most bands, that means the drum kit, keyboard rigs, amplifiers, large pedalboards, risers, and any performer who needs a fixed position.
The drum kit is often placed upstage center, but it does not have to be. A drummer running tracks may need a laptop stand or playback rack within reach. A keyboard player may need enough room for two keyboards, a bench, a vocal microphone, and a small mixer. A guitarist may need space for an amplifier behind them and a large pedalboard in front. Showing these items early makes it easier to position everyone else without creating an impossible layout.
Try to represent the amount of space each setup actually needs. The icons do not have to be perfectly scaled, but a keyboard rig should not be squeezed into the same space as a microphone stand if the real setup takes several feet. Think about how musicians enter and leave the stage, where cases will be removed after load in, and whether anyone needs a clear path to another instrument during the set.
4. Add microphones, DIs, playback rigs, and other connections
Once the performers and main equipment are in place, add the items that connect the stage to the sound system. This normally includes vocal microphones, microphones on amplifiers, direct boxes, laptop or playback rigs, electronic drums, and any other source the engineer will need to patch.
You do not need to draw every XLR or instrument cable. A stage plot is meant to explain the setup, not trace the entire signal path. Include a connection when its location or routing matters. For example, placing a DI box beside an acoustic guitarist tells the crew where that connection is needed. Showing a stereo playback rig makes it clear that the laptop is not simply sitting onstage as a personal device.
If you are unsure whether something requires a DI box, describe the output rather than guessing. A note such as Stereo XLR outputs from band interface is more useful than requesting two DIs that may not be necessary. The same principle applies to modelers, keyboards, electronic percussion, and other equipment with different output options.
5. Build the input list in a logical order
The Inputs field should list every source the sound engineer needs to receive. A typical input list begins with drums, followed by bass, guitars, keyboards or other instruments, playback, and vocals. The exact order can vary, but keeping related sources together makes the document easier to patch and scan.
A simple five piece band might begin with kick, snare, toms, overheads, bass DI, guitar amp one, guitar amp two, lead vocal, and backing vocals. If the band carries its own microphones or DIs, identify that in the Notes field. If the venue can use its standard microphone package, there is usually no need to demand a specific model for every input.
Stereo sources need two input channels. A keyboard listed only as Keys may leave the engineer unsure whether to prepare one channel or two. Write Keyboard L and Keyboard R when stereo is required. The same applies to tracks, samplers, and electronic drum outputs. If mono is acceptable when the venue is short on channels, that flexibility belongs in the Notes field.
The input list and drawing should agree. If the plot shows three vocal microphones, the Inputs field should not list four vocal channels. If the bass uses a DI and a microphone on the cabinet, both sources should appear. Before sending the plot, compare the drawing and inputs one item at a time.
6. Describe the monitoring setup clearly
Monitoring tells each performer what they need to hear onstage and how that sound reaches them. The setup may use floor wedges, wired in ear monitors, wireless in ear monitors, amplifier volume, or a combination of these.
If your band uses wedges, show their locations on the plot and describe the mixes in the Monitoring field. You might write Mix 1: lead vocal, acoustic guitar, and a little keys or Mix 2: backing vocal, lead vocal, and kick. If two performers can share one mix, say so. If each person needs an independent mix, the venue needs to know that before the show.
For in ear systems, explain what the band provides and what is expected from the venue. Band provides complete wireless in ear system and split means something very different from Three wired in ear mixes needed from venue. Do not assume that writing “IEMs” gives the engineer enough information to prepare the system.
Monitoring requests should reflect what the band actually needs, not the most elaborate setup you could imagine. Smaller venues may have fewer available mixes. If you can perform with three independent mixes even though four would be ideal, note the minimum and preferred setup. That gives the engineer something useful to plan around.
7. Use the Notes field for information that applies to the whole setup
The Notes field is the right place for general production details that do not need their own icon or input row. This may include equipment ownership, power requirements, setup flexibility, substitutions, or anything else that could prevent confusion.
Useful notes might say that the band provides all backline, the venue needs to provide three DIs, the keyboard can run in mono if necessary, or standard house drum microphones are fine. If an amplifier has a built in DI output, you can specify whether the engineer should use it. If the drummer controls tracks from the stage, the notes can explain whether the click is sent only to the band's monitors.
Keep this section focused on production. Arrival time, parking, meals, guest lists, and dressing room requests belong in an advance email or technical and hospitality rider. The stage plot should remain easy for the crew to use while setting the stage.
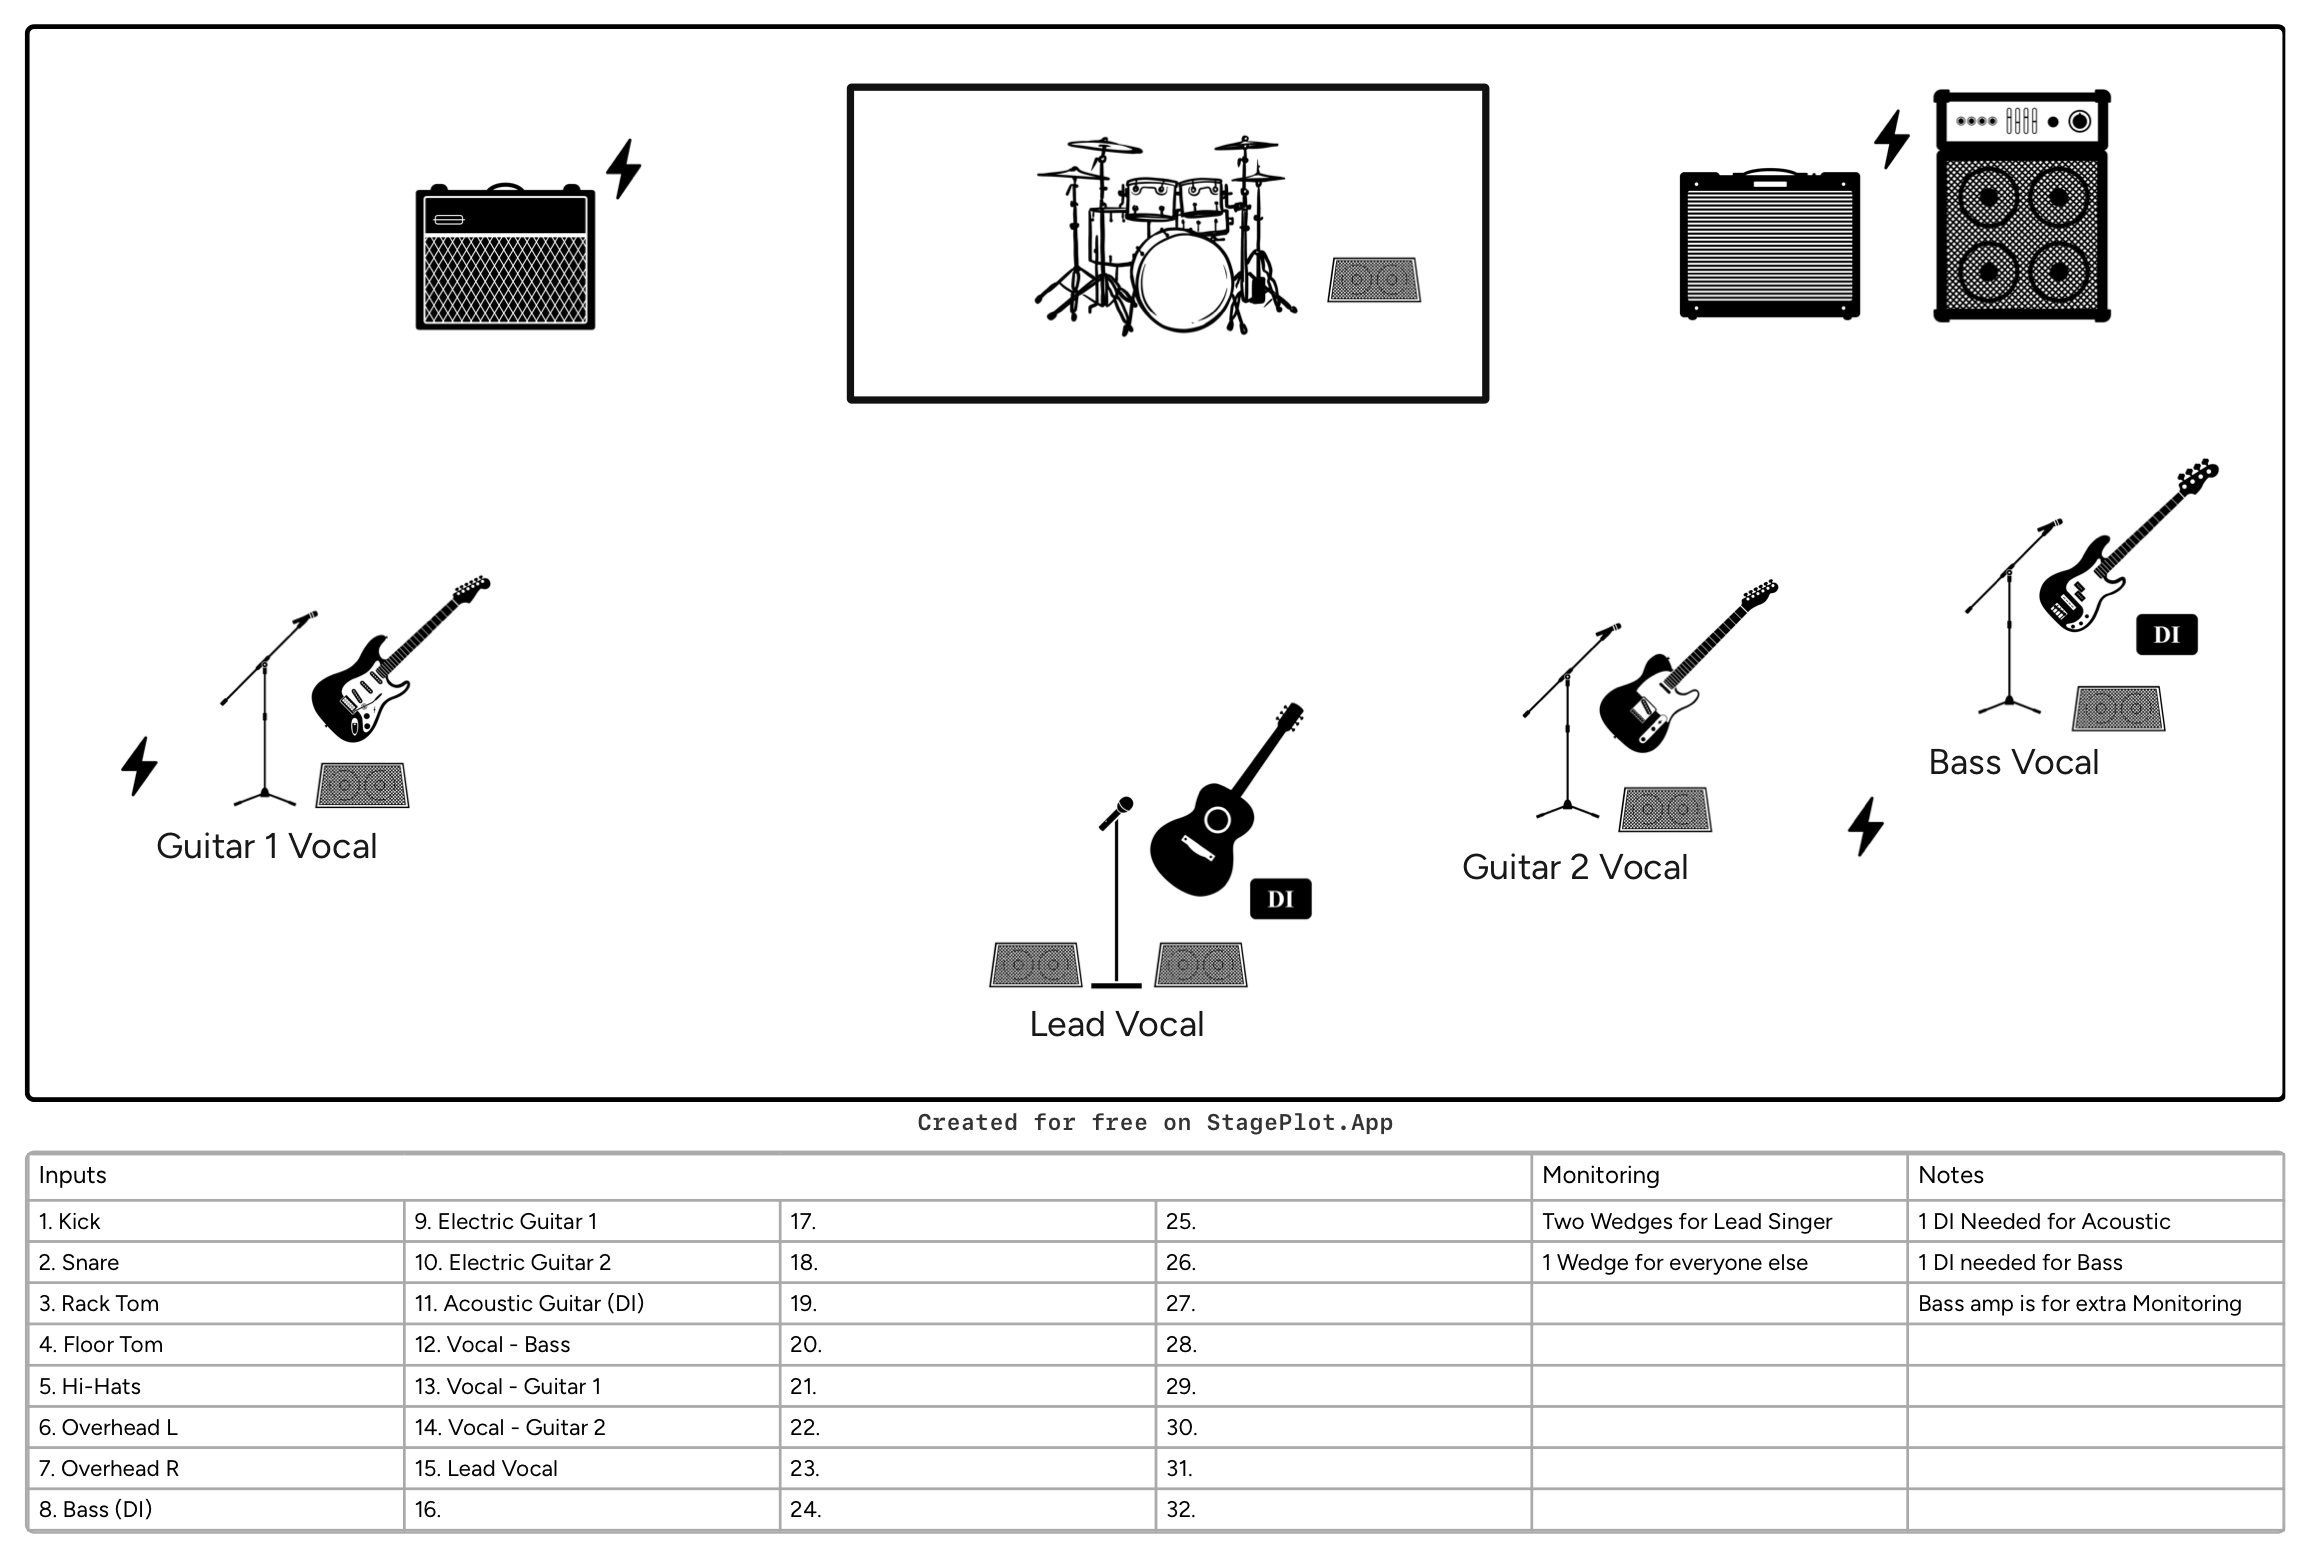
A simple five piece band stage plot example
Imagine a five piece band with drums, bass, two guitars, and a lead vocalist. The drum kit sits upstage center. The bassist stands stage right with the bass amp behind them. The guitarists stand on opposite sides of the stage with their amplifiers behind them, and the lead vocalist stands downstage center. Three members sing backing vocals, so the plot shows four vocal microphone positions in total.
The Inputs field lists the drum microphones first, followed by bass DI, the two guitar amplifier microphones, lead vocal, and three backing vocals. The Monitoring field describes four mixes: one for the lead vocalist, one shared by the musicians on stage right, one shared on stage left, and one for the drummer. The Notes field explains that the band provides its instruments and amplifiers while the venue provides microphones, stands, DIs, wedges, and power.
That is enough information for a venue to understand the basic setup before the band arrives. The document does not need to show instrument cables, every drum stand, or the exact route of each microphone cable. Those details can be handled by the crew during setup.
Common stage plot mistakes
The most common problems are usually small inconsistencies rather than major technical errors. A performer appears on the drawing but not in the input list. The band requests stereo keys but lists only one keyboard channel. Four wedges appear onstage, but the monitoring section does not say whether they need separate mixes. Stage left and right are reversed. An unusual piece of equipment is shown without a label, leaving the engineer to guess what it is.
Another common mistake is trying to make the plot cover every possible version of the band. If the lineup changes regularly, create a separate plot for each common configuration. A trio setup, full band setup, and acoustic setup may share some equipment, but combining all three into one document makes the plot harder to understand. Sending the version that matches the actual show is more helpful than adding a paragraph about every possible substitute. The free stage plot templates are a useful starting point when you need a different lineup.
Avoid filling the document with requests that do not affect the stage. A stage plot works best when it remains a focused production tool. If a detail will not change what the crew places, patches, powers, or monitors, it probably belongs somewhere else.
When should you update and send your stage plot?
Update the plot whenever the lineup, equipment, input count, or monitoring setup changes in a meaningful way. Replacing one electric guitar with another usually does not matter. Adding a backing track rig, switching from wedges to in ear monitors, or bringing a guest keyboard player definitely does.
Send the stage plot during the advance process, ideally with enough time for the venue or production contact to ask questions. For a local club show, that may be a few days ahead. Festivals, fly dates, corporate events, and larger productions may request technical information weeks or months in advance. If the venue sends its own production questionnaire, provide the plot along with the requested information rather than assuming the PDF answers everything.
Put the band name and a reliable contact on the document. If you know the venue and show date, include those as well. Clear file names also help. Band Name Stage Plot 2026.pdf is much easier to identify later than stageplot final new 3.pdf.
Make the document easy to use
The best stage plot is not necessarily the most detailed one. It is the one that gives the production team an accurate view of the show and makes the next question easier to answer. Start with the lineup, place the largest equipment, add the connections that matter, and make sure the Inputs, Monitoring, and Notes sections agree with the drawing.
Once the information is correct, the actual document should not take long to build. StagePlot.app includes instruments, microphones, amplifiers, monitors, DIs, and other common stage equipment, along with fields for Inputs, Monitoring, and Notes. You can start with a template or build the setup from scratch, then adjust it as your band changes.
Create your band's stage plot and give the venue a clear picture before load in.